G-Suite
Synology NAS
Symantec
FortiGate
FortiAnalyzer
ติดต่อเรา
Lorem ipsum dolor sit amet, consectetur
adipiscing elit. Nullam fermentum fermentum
tortor nec dignissim. Nunc sit amet augue dui.
Integer vestibulum vel eros a sollicitudin. Nunc
in rutrum mi. Aliquam mollis ac urna eget
molestie. Aenean vel maximus nisi. Nullam
ligula nunc, iaculis eu leo accumsan,
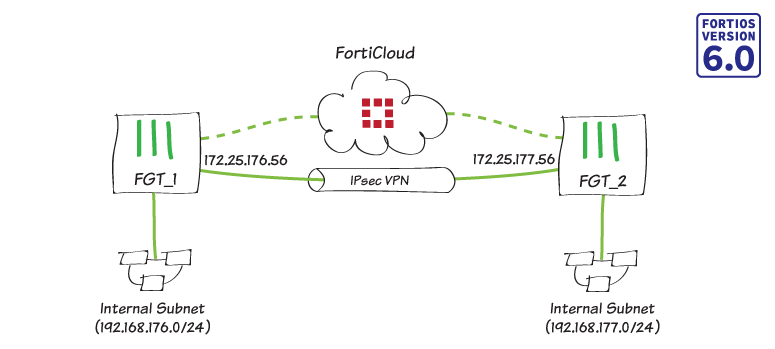
ในกรณีนี้คุณใช้ Cloud-assisted OCVPN solution ใหม่ใน FortiOS 6.0 เพื่อลดความยุ่งยากในการเตรียมและกำหนดค่า IPsec VPN
หมายเหตุ : ข้อจำกัด ต่อไปนี้:
=> FortiGate จะต้องลงทะเบียนพร้อมกับ FortiCare Support license ที่ถูกต้อง
=> รองรับเฉพาะการกำหนดค่า VPN แบบ Full-mesh โดยใช้การเข้ารหัส PSK (PSK cryptography)
=> ต้องใช้ Public IPs (FortiGates ที่อยู่เบื้องหลัง NAT ไม่สามารถเข้าร่วมได้)
=> ไม่รองรับ Non-root VDOMs และ FortiGate VMs
=> คุณสามารถเพิ่มโหนดได้มากถึง 16 โหนดใน OCVPN cloud, โดยแต่ละโหนดจะมี Subnet สูงสุด 16 Subnets
คุณสามารถทำซ้ำขั้นตอนที่ 1 ด้านล่าง เพื่อเพิ่มโหนดได้สูงสุด 16 โหนดใน OCVPN cloud (ยกเว้นข้อจำกัด ข้างต้น) แต่คุณจะกำหนดค่าเพียงสองโหนดในตัวอย่างต่อไปนี้
1. เปิดใช้งาน OCVPN
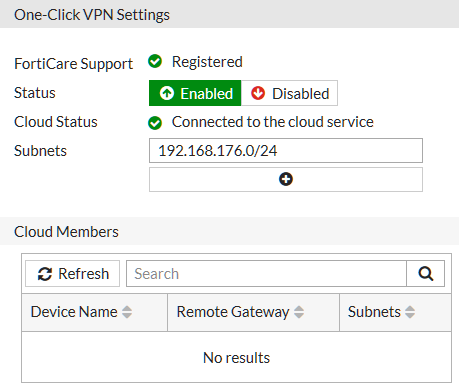
1.1 => บน FGT_1, ให้ไปที่ “VPN > One-Click VPN Settings”
=> ตั้งค่า “Status” เป็น Enabled และยืนยัน “Cloud Status” อาจใช้เวลาหนึ่งหรือสองนาที จากนั้น เครื่องหมายถูกสีเขียวจะปรากฏขึ้นพร้อมกับข้อความ “Connected to the cloud service”
=> สุดท้าย, เพิ่ม Subnets ที่จำเป็นจาก FGT_1
1.2 => บน FGT_2, ให้ทำซ้ำขั้นตอนข้างต้น
=> เปิดใช้งาน และยืนยันการเชื่อมต่อกับ Cloud service แล้วเพิ่ม Subnets ที่จำเป็นจาก FGT_2

2. ยืนยันการเป็นสมาชิก Cloud (Cloud membership)
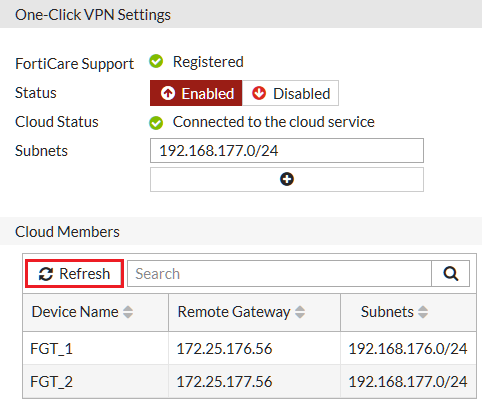
2.1 => ในตาราง Cloud Members บน FGT_1, คลิก “Refresh” และยืนยันรายการ
=> Remote gateway และ Subnet ที่สอดคล้องกัน (Corresponding subnets) สำหรับแต่ละอุปกรณ์ควรเติมในรายการ
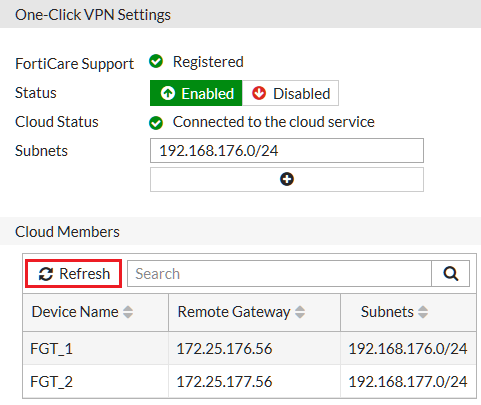
2.2 => คุณสามารถทำตามขั้นตอนข้างต้นบน FortiGate ใดๆ ที่เป็นสมาชิกของ OCVPN cloud
=> FGT_2 ควรมีผลลัพธ์เช่นเดียวกับข้างต้น
3. ผลลัพธ์
=> ในขณะที่ตารางสมาชิก Cloud ปรากฏขึ้น, OCVPN cloud จะอัพเดทสมาชิกแต่ละคนโดยอัตโนมัติ
=> ตอนนี้คุณสามารถตรวจสอบว่าส่วนที่เหลือของการกำหนดค่าได้ถูกสร้างขึ้น และดำเนินการทดสอบ Tunnel
=> บน FortiGate, ให้ไปที่ “VPN > IPsec Tunnels” และยืนยันรายการของ Tunnel ใหม่ด้วยคำนำหน้า _OCVPN

=> ไปที่ “Network > Static Routes” และยืนยัน Static routes ใหม่

=> ไปที่ “Policy & Objects > IPv4 Policy” และยืนยัน Policy ใหม่

=> ไปที่ “Monitor > IPsec Monitor” และตรวจสอบว่า Tunnel status เป็น “Up”

=> ไปที่ “Log & Report > VPN Events” และดู Tunnel statistics

=> ใช้ Command Prompt / Terminal, พยายาม Ping จากเครือข่ายภายในหนึ่งไปยังอีกเครือข่ายหนึ่ง โดย Ping ควรจะประสบความสำเร็จ
ping 192.168.177.99
Pinging 192.168.177.99 with 32 bytes of data:
Reply from 192.168.177.99: bytes=32 time=5ms TTL=254
Reply from 192.168.177.99: bytes=32 time=1ms TTL=254
Reply from 192.168.177.99: bytes=32 time<1ms TTL=254
Reply from 192.168.177.99: bytes=32 time<1ms TTL=254
Ping statistics for 192.168.177.99:
Packets: Sent = 4, Received = 4, Lost = 0 (0% loss),
Approximate round trip times in milli-seconds:
Minimum = 0ms, Maximum = 5ms, Average = 1ms
=> ตอนนี้ให้ปิดการใช้งาน OCVPN (VPN > One-Click VPN Settings) และทำการ Ping ซ้ำ จะพบว่า ไม่สามารถ Ping ไปได้
ping 192.168.177.99
Pinging 192.168.177.99 with 32 bytes of data:
Reply from 192.168.176.99: Destination net unreachable.
Reply from 192.168.176.99: Destination net unreachable.
Reply from 192.168.176.99: Destination net unreachable.
Reply from 192.168.176.99: Destination net unreachable.
Ping statistics for 192.168.177.99:
Packets: Sent = 4, Received = 0, Lost = 4 (100% loss),
=> เปิดใช้งาน OCVPN อีกครั้ง
4. การแก้ไขปัญหา
4.1 => ในการตรวจสอบสถานะ OCVPN ให้ใช้คำสั่งต่อไปนี้:
FGT_1 # diag vpn ocvpn status
Current State : registered
OCVPN Status : OK (200)
4.2 => ในการดูสถานะอุปกรณ์ใช้คำสั่งต่อไปนี้:
FGT_1 # diag vpn ocvpn device-state
FGT_1 wan1 172.25.176.56 0 6 0 2 200 2 0x3 0x3
4.3 => ในการพิมพ์รายงานบันทึกใช้คำสั่งต่อไปนี้:
FGT_1 # diag vpn ocvpn log
OCVPN Polling: state = undefined
cvpn_save_state: FGT_1 0.0.0.0 -1 0 0 0 0 0 0x0 0x0
OCVPN Polling: state = undefined
cvpn_save_state: FGT_1 0.0.0.0 -1 0 0 0 0 0 0x0 0x0
OCVPN Polling: state = undefined
cvpn_save_state: FGT_1 0.0.0.0 -1 0 0 0 0 0 0x0 0x0
========================
Thurs Mar 29 09:00:00 2018
========================
cvpn_load_state: FGT_1 0.0.0.0 -1 0 0 0 0 0 0x0 0x0
OCVPN Register: sn=x, num_subnets=0
Current State: undefined -> registering
cvpn_save_state: FGT_1 0.0.0.0 -1 2 0 0 0 0 0x0 0x0
WAN intf wan1, IP 172.25.176.56/255.255.255.0
WAN intf changed from to wan1
WAN IP changed from 0.0.0.0 to 172.25.176.56
Local Subnets:
192.168.176.0/255.255.255.0
JSON Update request = '{ "SN": "x", "IPv4": "172.25.176.56", "port": "500", "Name": "FGT_1", "subnets": [ "192.168.176.0\/255.255.255.0" ] }'
Sending OCVPN request: method=Update, data='{ "SN": "x", "IPv4": "172.25.176.56", "port": "500", "Name": "FGT_1", "subnets": [ "192.168.176.0\/255.255.255.0" ] }'
Received OCVPN response: method=Update, res=0, http_resp=200
JSON Response: '{"key":"","rev":1,"members":[{"IPv4":"172.25.176.56","port":"500","slot":0,"subnets":["192.168.176.0/255.255.255.0"],"Name":"FGT_1"}]}'
Member table size = 1
Member: { "IPv4": "172.25.176.56", "port": "500", "slot": 0, "subnets": [ "192.168.176.0\/255.255.255.0" ], "Name": "FGT_1" }
Subnet 192.168.176.0/255.255.255.0
cvpn_config_install: prev mask 0x1, new mask 0x1
Update response code = 200
Current State: updating -> registered
cvpn_save_state: FGT_1 wan1 172.25.176.56 0 6 0 1 200 1 0x1 0x1
JSON Response: '{"key":"8TVdIwG2xS400jMOxyNN9WKOYWZEsaJDIV8JUGVK2FaHoEVqQPw2qDgt5RLHlZXAuInpCHwl9t8WpZ7jWD+6xg==",
"rev":1,"members":[{"IPv4":"172.25.176.56","port":"500","slot":0,"subnets":["192.168.176.0/255.255.255.0"],"Name":"FGT_1"}]}'
Member table size = 1
Member: { "IPv4": "172.25.176.56", "port": "500", "slot": 0, "subnets": [ "192.168.176.0\/255.255.255.0" ], "Name": "FGT_1" }
Subnet 192.168.176.0/255.255.255.0
cvpn_config_install: prev mask 0x0, new mask 0x1
New members table, revision = 1
Register response code = 200
Current State: registering -> registered
cvpn_save_state: FGT_1 wan1 172.25.176.56 0 6 0 1 200 1 0x1 0x0
Current State: registered -> acknowledging
cvpn_save_state: FGT_1 wan1 172.25.176.56 0 5 6 1 200 1 0x1 0x0
JSON regack request = '{ "SN": "x", "rev": 1 }'
Sending OCVPN request: method=RegAck, data='{ "SN": "x", "rev": 1 }'
Received OCVPN response: method=RegAck, res=0, http_resp=200
JSON Response: '{"message":"Device successfully acknowledged"}'
Message='Device successfully acknowledged'
RegAck response code = 200
Current State: acknowledging -> registered
cvpn_save_state: FGT_1 wan1 172.25.176.56 0 6 6 1 200 1 0x1 0x0
OCVPN Update: sn=x, num_subnets=0
Current State: registered -> updating
cvpn_save_state: FGT_1 wan1 172.25.176.56 0 3 0 1 200 1 0x1 0x0
WAN intf wan1, IP 172.25.176.56/255.255.255.0
Local Subnets:
cvpn_build_json_reg_upd: internal error, line 1187
cvpn_build_json_reg_upd: res = -1
sys_ocvpn_update: res=-1
WAN intf wan1, IP 172.25.176.56/255.255.255.0
OCVPN Update: sn=x, num_subnets=1
Current State: updating
WAN intf wan1, IP 172.25.176.56/255.255.255.0
Local Subnets:
192.168.176.0/255.255.255.0
JSON Update request = '{ "SN": "x", "IPv4": "172.25.176.56", "port": "500", "Name": "FGT_1", "subnets": [ "192.168.176.0\/255.255.255.0" ] }'
Sending OCVPN request: method=Update, data='{ "SN": "IPv4": "172.25.176.56", "port": "500", "Name": "FGT_1", "subnets": [ "192.168.176.0\/255.255.255.0" ] }'
Received OCVPN response: method=Update, res=0, http_resp=200
JSON Response: '{"key":"","rev":1,"members":[{"IPv4":"172.25.176.56","port":"500","slot":0,"subnets":["192.168.176.0/255.255.255.0"],"Name":"FGT_1"}]}'
Member table size = 1
Member: { "IPv4": "172.25.176.56", "port": "500", "slot": 0, "subnets": [ "192.168.176.0\/255.255.255.0" ], "Name": "FGT_1" }
Subnet 192.168.176.0/255.255.255.0
cvpn_config_install: prev mask 0x1, new mask 0x1
Update response code = 200
Current State: updating -> registered
cvpn_save_state: FGT_1 wan1 172.25.176.56 0 6 0 1 200 1 0x1 0x1
4.4 => ในการดูรายการสมาชิก OCVPN cloud ให้ใช้คำสั่งต่อไปนี้:
FGT_1 # diag vpn ocvpn print-members
Member: { "IPv4": "172.25.176.56", "port": "500", "slot": 0, "subnets": [ "192.168.176.0\/255.255.255.0" ], "Name": "FGT_1" }
Member: { "IPv4": "172.25.177.56", "port": "500", "slot": 1, "subnets": [ "192.168.177.0\/255.255.255.0" ], "Name": "FGT_2" }
