G-Suite
Synology NAS
Symantec
FortiGate
FortiAnalyzer
ติดต่อเรา
Lorem ipsum dolor sit amet, consectetur
adipiscing elit. Nullam fermentum fermentum
tortor nec dignissim. Nunc sit amet augue dui.
Integer vestibulum vel eros a sollicitudin. Nunc
in rutrum mi. Aliquam mollis ac urna eget
molestie. Aenean vel maximus nisi. Nullam
ligula nunc, iaculis eu leo accumsan,

ในกรณีนี้คุณจะเพิ่ม FortiSandbox ลงใน Security Fabric ของ Fortinet และกำหนดค่า FortiGate แต่ละตัวในเครือข่ายเพื่อส่งไฟล์ที่น่าสงสัยไปยัง FortiSandbox เพื่อตรวจสอบใน Sandbox FortiSandbox จะสแกน และทดสอบไฟล์เหล่านี้แยกจากเครือข่ายของคุณ
ตัวอย่างนี้ใช้การกำหนดค่า Security Fabric ที่สร้างขึ้นใน Collection ของ Fortinet Security Fabric โดย FortiSandbox จะเชื่อมต่อกับ Root FortiGate ใน Security Fabric หรือที่รู้จักในชื่อ External โดยมีสองการเชื่อมต่อระหว่างอุปกรณ์ :
=> Port FortiSandbox 1 (Administration port) เชื่อมต่อกับ Port Edge 16
=> Port FortiSandbox 3 (VM outgoing port) เชื่อมต่อกับ Port Edge 13
1. ตรวจสอบผลลัพธ์ Security Rating ก่อนทำการติดตั้ง FortiSandbox
1.1 => บน Edge (Root FortiGate ใน Security Fabric) ไปที่ “Security Fabric > Security Rating”
=> เนื่องจากคุณยังไม่ได้ติดตั้ง FortiSandbox ในเครือข่ายของคุณ Security Fabric จึงล้มเหลวในการตรวจสอบ “Advanced Threat Protection”
=> ในตัวอย่าง Security Rating Score ลดลง 30 คะแนน สำหรับแต่ละ FortiGates ของ 4 FortiGates ใน Security Fabric

2. เชื่อมต่อ FortiSandbox และ Edge
2.1 => เชื่อมต่อกับ FortiSandbox
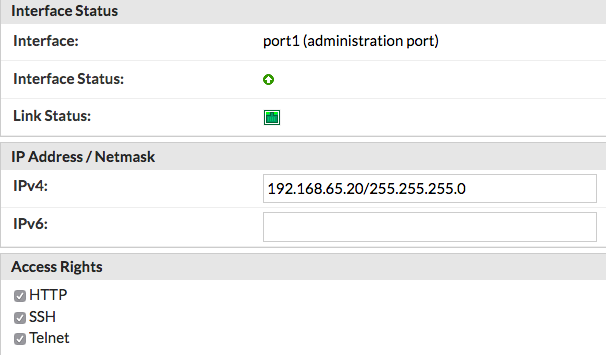
=> ในการแก้ไข Port 1 ซึ่งใช้สำหรับการสื่อสารระหว่าง FortiSandbox และส่วนที่เหลือของ Security Fabric ให้ไปที่ “Network > Interfaces”
=> ตั้งค่า "IP Address/Netmask" เป็น IP Address ภายใน ในตัวอย่างนี้ FortiSandbox เชื่อมต่อ Subnet เดียวกันกับ FortiAnalyzer ที่คุณติดตั้งก่อนหน้านี้ โดยใช้ IP Address 192.168.65.20
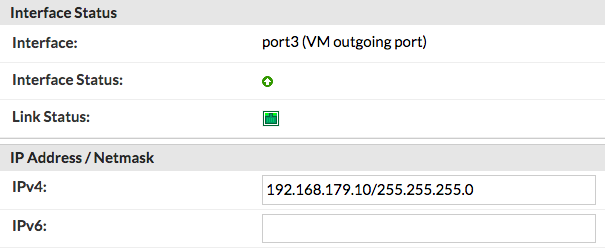
2.2 => แก้ไข Port 3 โดย Port นี้ใช้สำหรับการสื่อสารขาออกโดย Virtual machines (VMs) ที่รันบน FortiSandbox แนะนำให้คุณเชื่อมต่อ Port นี้กับ Interface เฉพาะของ FortiGate เพื่อปกป้องส่วนที่เหลือของเครือข่ายจากการคุกคามที่ FortiSandbox กำลังสืบสวนอยู่
=> ตั้งค่า "IP Address/Netmask" เป็น IP Address ภายใน (ในตัวอย่างเป็น 192.168.179.10/ 255.255.255.0)
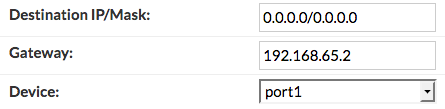
2.3 => ในการเพิ่ม Static route ให้ไปที่ “Network > System Routing” ตั้งค่า "Gateway" เป็น IP Address ของ FortiGate Interface ที่ Port 1 เชื่อมต่อ (ในตัวอย่างเป็น 192.168.65.2)
2.4 => เชื่อมต่อกับ Edge
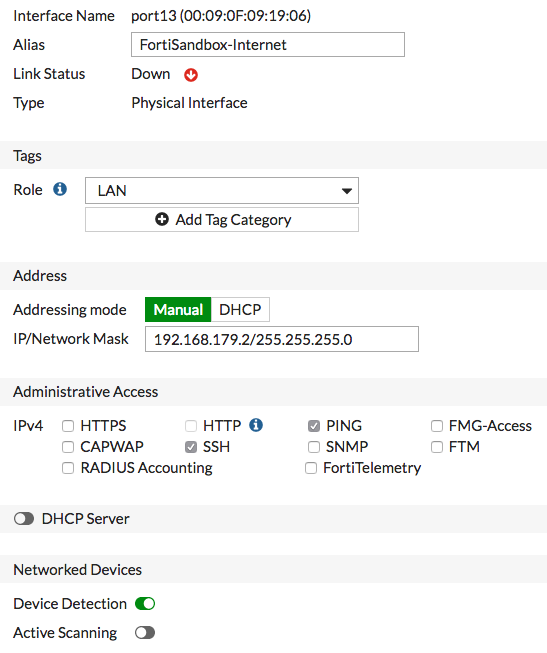
=> ในการกำหนดค่า Port ที่เชื่อมต่อกับ Port 3 บน FortiSandbox (ในตัวอย่างเป็น Port 13) ให้ไปที่ “Network > Interfaces” ตั้งค่า "IP/Network Mask" เป็น Address บน Subnet เดียวกันกับ Port 3 บน FortiSandbox (ในตัวอย่างเป็น 192.168.179.2/255.255.255.0)
2.5 => เชื่อมต่อ FortiSandbox กับ Security Fabric
3. การอนุญาตให้เข้าถึงอินเทอร์เน็ตของ VM
3.1 => เชื่อมต่อกับ Edge
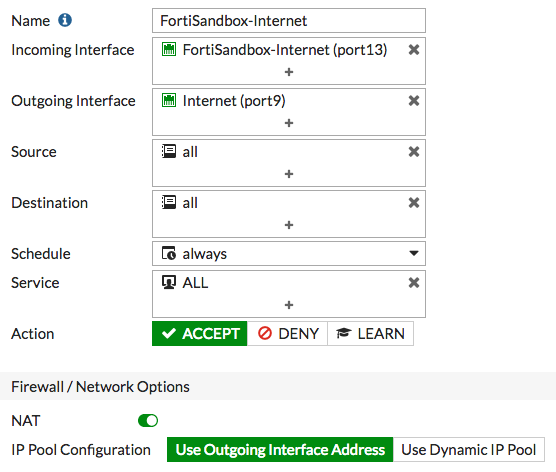
=> ในการสร้าง Policy ที่อนุญาตการเชื่อมต่อจาก FortiSandbox ไปยังอินเทอร์เน็ต ให้ไปที่ “Policy & Objects > IPv4 Policy”
3.2 => เชื่อมต่อกับ FortiSandbox
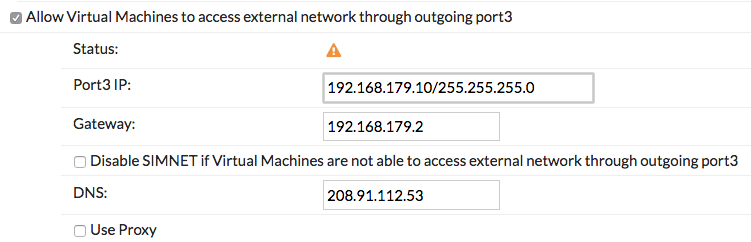
=> ไปที่ “Scan Policy > General” และเลือก Allow Virtual Machines to access external network through outgoing port3 ตั้งค่า “Gateway” เป็น IP Address ของ Port 13 บน FortiGate
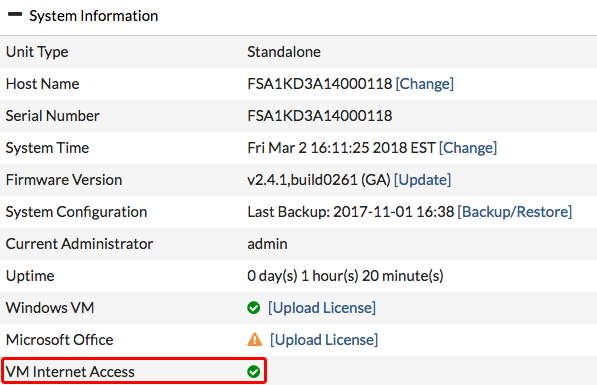
3.3 => ไปที่ “Dashboard” และค้นหา “System Information” widget ตรวจสอบว่า “VM Internet Access” มีเครื่องหมายถูกสีเขียวอยู่ด้านข้าง
4. เพิ่ม FortiSandbox ลงใน Security Fabric
4.1 => เชื่อมต่อกับ Edge
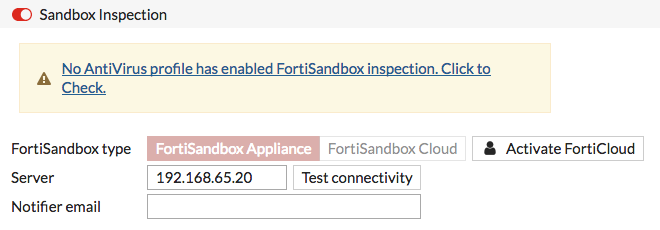
=> ในการเพิ่ม FortiSandbox ลงใน Security Fabric ให้ไปที่ “Security Fabric > Settings” เปิดใช้งาน Sandbox Inspection
=> ตรวจสอบให้แน่ใจว่า “FortiSandbox Appliance” ถูกเลือก และตั้งค่า “Server” เป็น IP Address ของ Port 1 บน FortiSandbox

4.2 => เลือก “Test Connectivity” ข้อความแสดงข้อผิดพลาดจะปรากฏขึ้นเนื่องจาก Edge ไม่ได้รับอนุญาตบน FortiSandbox

4.3 => Edge ในฐานะที่เป็น Root FortiGate จะผลักดันการตั้งค่า FortiSandbox ไปยัง FortiGates อื่นๆ ใน Security Fabric ในการตรวจสอบสิ่งนี้ ให้เชื่อมต่อกับ Accounting และไปที่ “Security Fabric > Settings”
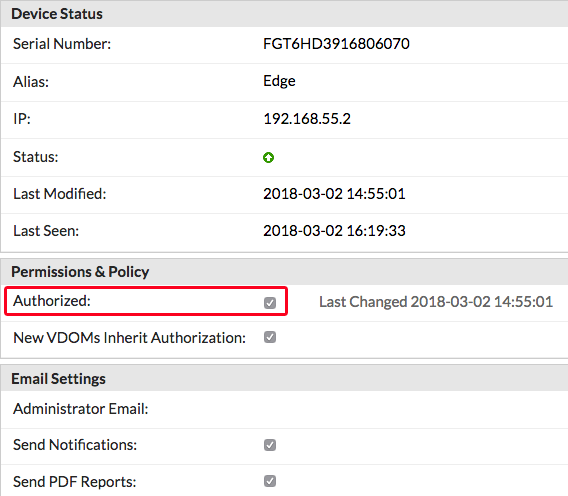
4.4 => บน FortiSandbox ไปที่ “Scan Input > Device” FortiGates ใน Security Fabric (Edge, Accounting, Marketing และ Sales) จะแสดงรายการ แต่ Column Auth จะระบุว่าอุปกรณ์ไม่ได้รับอนุญาต

4.5 => เลือก และแก้ไข Edge ภายใต้ “Permissions & Policies” ให้เลือก Authorized
=> ทำซ้ำสำหรับ FortiGates อื่นๆ
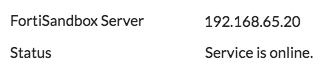
4.6 => บน Edge ให้ไปที่ “Security Fabric > Settings” และทดสอบการเชื่อมต่อ “Sandbox Inspection” อีกครั้ง ตอนนี้ External ได้เชื่อมต่อกับ FortiSandbox แล้ว
5. เพิ่ม Sandbox inspection ให้กับ Antivirus, Web Filter และ FortiClient
คุณสามารถใช้ Sandbox inspection กับ Security inspection 3 ประเภท ได้แก่ Antivirus, Web filter, และ FortiClient ในขั้นตอนนี้คุณเพิ่ม Sandbox ลงในอุปกรณ์ FortiGate ทั้งหมดใน Security Fabric แต่ละรายการ โดยใช้ Profiles ที่ FortiGate แต่ละรายการใช้กับการรับส่งข้อมูลเครือข่าย (Network traffic)
ในการผ่านการตรวจสอบการป้องกันภัยคุกคามขั้นสูง (Advanced Threat Protection) คุณจะต้องเพิ่ม Sandbox inspection ไปยัง Antivirus profiles สำหรับอุปกรณ์ FortiGate ทั้งหมดใน Security Fabric
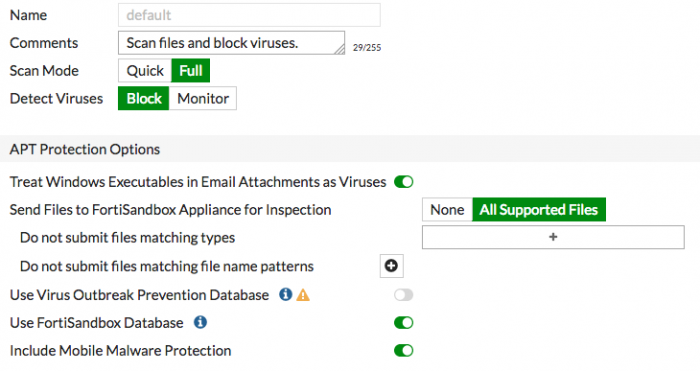
5.1 => ไปที่ “Security Profiles > AntiVirus” และแก้ไข Default profile
=> ภายใต้ “Inspection Options” ให้ตั้งค่า “Send Files to FortiSandbox Appliance for Inspection” เป็น “All Supported Files”
=> เปิดใช้งาน “Use FortiSandbox Database” เพื่อที่ว่าหาก FortiSandbox ค้นพบภัยคุกคามมันจะเพิ่ม Signature สำหรับไฟล์นั้นไปยัง Antivirus signature database บน FortiGate
5.2 => ไปที่ “Security Profiles > Web Filter” และแก้ไข Default profile
=> ภายใต้ “Static URL Filter”, ให้เปิดใช้งาน Block malicious URLs discovered by FortiSandbox

5.3 => หาก FortiSandbox ค้นพบภัยคุกคาม, URL ที่มาจากภัยคุกคามนั้นจะถูกเพิ่มเข้าไปในรายการ URL ที่ถูก Block โดย FortiGate
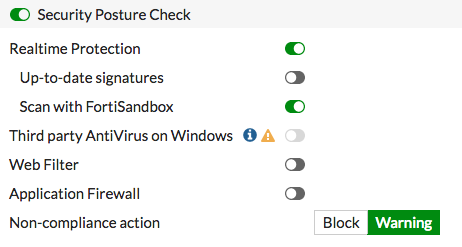
5.4 => ไปที่ “Security Profiles > FortiClient Compliance Profiles” และแก้ไข Default profile เปิดใช้งาน “Security Posture Check”
=> เปิดใช้งาน Realtime Protection และ Scan with FortiSandbox
6. ผลลัพธ์
=> หาก FortiGate ใน Security Fabric ค้นพบไฟล์ที่น่าสงสัยมันจะส่งไฟล์ไปยัง FortiSandbox
=> คุณสามารถดูข้อมูลเกี่ยวกับไฟล์ที่สแกนได้ใน FortiGate ที่ส่งไฟล์ หรือ FortiSandbox
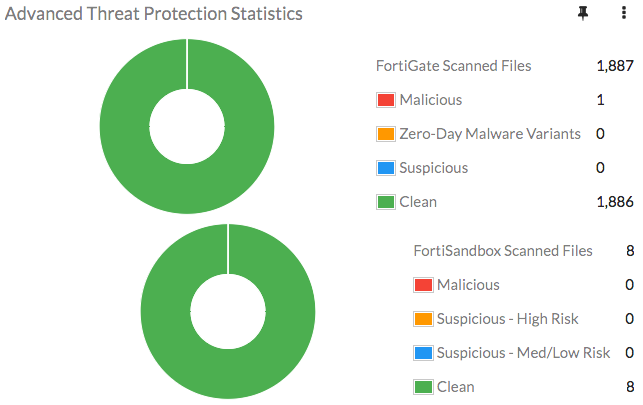
=> ในหนึ่งในอุปกรณ์ FortiGate ให้ไปที่ “Dashboard” และค้นหา “Advanced Threat Protection Statistics” widget โดย Widget นี้จะแสดงไฟล์ทั้งการสแกนที่ FortiGate และ FortiSandbox
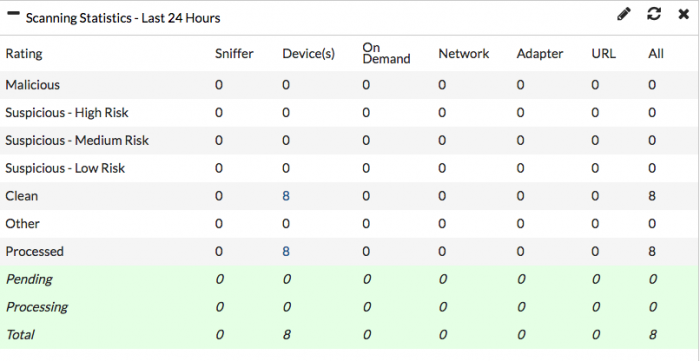
=> บน FortiSandbox, ให้ไปที่ “System > Status” และดู “Scanning Statistics” widget สำหรับข้อมูลสรุปของไฟล์ที่สแกน
=> คุณยังสามารถดู Timeline ของการสแกนใน “File Scanning Activity” widget
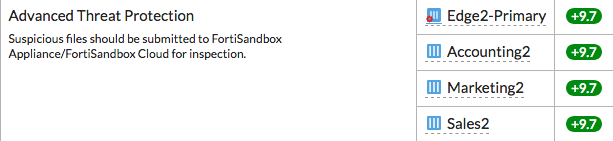
=> บน Edge, ให้ไปที่ “Security Fabric > Security Rating” และทำการจัด Rating เมื่อเสร็จแล้วให้เลือกมุมมอง “All Results”
=> ในตัวอย่าง อุปกรณ์ FortiGate ทั้งสี่ ใน Security Fabric ผ่านการตรวจสอบการป้องกันภัยคุกคามขั้นสูง (Advanced Threat Protection) และ Security Rating Score จะเพิ่มขึ้น 9.7 คะแนนสำหรับแต่ละ FortiGate